acrylic adhesive, structural adhesive,acrylic based adhesive,2 part acrylic adhesive,acrylic adhesive glue,acrylic glue Dongguan Shuangzhan Industrial Co.,Ltd , https://www.lingwogroup.com
A 4-20mA current loop output or signal serves as a standardized tool for testing and troubleshooting industrial process control or monitoring devices such as pressure transmitters and flowmeters. Modern instruments like the Rosemount pressure transmitter operate on the Highway Addressable Remote Transducer (HART) protocol, featuring a 2-wire electronic system with a 4-20mA current loop output. This scale is vital for assessing the performance capabilities of pressure transmitters. Hence, understanding how to test and troubleshoot a 4-20mA signal output is essential for any operator. In this post, we’ll explore two methods for testing the 4-20mA current output of a pressure transmitter.
### The Importance of 4-20mA Current Loop Output Signals in Pressure Transmitters
The 4-20mA signal represents a converted value of the output generated by a pressure transmitter. Based on the HART protocol, the transmitter's output is transformed into a proportional current to display readings. Typically, at zero output, the transmitter shows a 4mA signal, while at full-scale output, it displays a 20mA signal.
Verifying 4-20mA current loop signals is critical for the calibration and troubleshooting of pressure transmitters. Operators use this scale to set performance configurations. There are two primary methods for measuring 4-20mA current loop outputs, which we will discuss next.
### Methods of Measuring 4-20mA Current Loop Outputs
#### Method 1: Measuring 4-20mA Signals Using a Process Clamp Meter
This method allows you to measure 4-20mA current loop signals without breaking the two-wire circuit. Here’s how:
1. Open up the transmitter to access the two-wire current loop and signal wires.
2. Attach the process clamp meter to the signal wires.
3. Check the mA output at zero-level. The reading should fall within the 4mA to 20mA range.
4. If the reading isn’t between 4-20mA, troubleshooting and calibration are necessary. A proper reading confirms the transmitter’s performance.
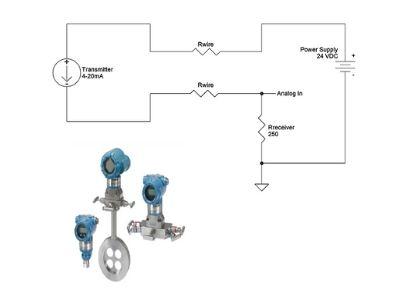
#### Method 2: Measuring 4-20mA Signals Using a Loop Calibrator or Multimeter
This approach involves breaking the two-wire current loop. Follow these steps:
1. Before starting, ensure the pressure transmitter is functioning correctly.
2. Open the transmitter to expose the two-wire loop circuit.
3. Connect the measuring ends of the two-wire loop to the mA reader. Ensure the multimeter or loop calibrator is set to DC measurement mode.
4. Disconnect one end of the signal leads and insert the multimeter or loop calibrator in series with the transmitter circuit.
5. Record the mA reading, which should be between 4mA and 20mA. If it’s outside this range, calibration is needed.
Both techniques allow professionals to test 4-20mA current loop signals effectively, ensuring reliable performance before troubleshooting or analyzing the transmitter’s functionality.
For precise and error-free testing of 4-20mA current signals, it’s advisable to consult industry experts. The Transmitter Shop is a trusted company offering high-quality pressure transmitters along with comprehensive testing and calibration services. With over three decades of experience repairing, calibrating, and troubleshooting both new and surplus transmitters, their expertise ensures top-notch service quality.
---
**Related Posts**
- What Are the Steps Involved in Calibrating a Pressure Gauge?
- All Important Questions on Reconditioned Transmitters Answered
- Is a Remanufactured Transmitter a Better Option Than a New One?
- Differential Pressure Transmitters: How Do They Aid in Flow Measurements?
- 3 Ways to Explain How Often You Should Calibrate a Pressure Transducer
- Guidelines for Troubleshooting Pressure Transducers
- Learn How to Calibrate a Pressure Transmitter – Part I
- Learn How to Calibrate a Pressure Transmitter – Part II
- Know Three Interesting Uses of Pressure Transmitters
- The Features and Benefits of Rosemount 1199 Direct Mount Transmitters
- 3 Major Pressure Transmitter Technologies That Made the Device Popular
- An Unconventional Guide to Selecting the Right Pressure Sensor
- Factors To Be Considered While Differentiating $40 and $400 Pressure Transmitters
- Tips to Augment the Performance and Service Life of Pressure Transmitters
- Factors to Consider When Choosing Pressure Transmitters
- 5 Most Popular Pressure Transmitter Technologies
- Important Calibration Tips for Pressure Sensors
- Tips to Improve the Performance of Pressure Sensors
- Factors to Consider When Choosing a Pressure Transmitter Manifold
- Safety Tips for Differential Pressure Transmitter Operation
- Impact of Shock and Vibration on Pressure Transducers
- Rosemount 3051S vs 3051C Transmitter – What is Your Choice?
- Rosemount 2088 Vs Rosemount 3051 – A Few Points of Differences Discussed
- What Are Diaphragm Seals and Their Types?
- Difference Between Conventional and Smart Transmitters
- How to Choose Diaphragm Seals for Your Application?
- How to Select a Pressure Transmitter for Your Application?
- Remote Seals: Significance, Working Principle & Applications
- How Do You Calibrate a Flow Transmitter?
- What is an Absolute Pressure Transmitter & How Does it Work?
- HART Communication Protocol: Overview, Working Principle, Benefits in Industrial Automation
- Absolute and Gauge Pressure Transmitters - Overview and Working Principle
- Flow Meter vs Flow Transmitter: Know the Difference
- Temperature Transmitter: How to Select the Efficient One for Your Application?
- How Do You Test for 4 to 20mA Signal in a Pressure Transmitter?
- Multivariable Transmitter: What Is It and How Does It Work?
- Pressure Transmitters vs. Pressure Transducers: Learn the Differential Characteristics
- Procedure to Calculate Accuracy of Pressure Transmitter Discussed
- An Ultimate Selection Guide for Flow Transmitters
- The Benefits and Challenges of HVAC System Balancing
- Understanding Pressure Ranges and Units for Fluid System Monitoring
- Understanding the Impact of Pressure Fluctuations on Drying Performance
- Monitoring and Controlling Energy Production in Power Plants
- Common Challenges in Air Flow Measurement and How to Overcome Them
- Pressure Monitoring in Pump Systems: A Comprehensive Guide
- Exploring Density and Viscosity Measurement in Industrial Processes
Acrylic structural adhesive Performance characteristics:
1.Fast curing speed: After the acrylic structural adhesive is evenly mixed according to a certain proportion, it can be initially fixed in 5 minutes, reach 80% strength in 30 minutes, and reach maximum strength in 24 hours.
2.Strong adhesion: strong adhesion to metal objects, and can also bond well to plastics, ceramics, wood and other materials
3.Good toughness: good impact resistance, which can reduce damage to the bonded parts when impacted by external forces
4.Weather resistance: good UV resistance and anti-aging properties
5.Chemical resistance: certain tolerance to chemicals such as acids, alkalis, and salts
Â
Acrylic structure adhesive application:
1.Automotive industry: used for automobile bodies, such as the connection of metal parts, the fixation of plastic interior parts, the installation of windshields, etc.
2.Electronics industry: In the manufacturing and assembly of electronic products, it is used for packaging circuit boards, fixing electronic components, bonding shells, etc., and can provide good electrical insulation and moisture-proof properties.
3.Construction industry: It can be used for the installation and sealing of building doors and windows, the pasting of stone and ceramic tiles, and the reinforcement and repair of building structures.
4.Aerospace field: In the manufacturing and maintenance of aerospace equipment such as aircraft and rockets, adhesives are required to have high strength and reliability for bonding and sealing structural parts.
5.Handicraft industry: used in the production of various handicrafts, such as ceramic handicrafts, glass handicrafts, resin handicrafts, etc.
Â